Disclosure : This post may contain affiliate links or paid partnerships. I may earn compensation if you click a link or make a purchase, at no additional cost to you. See my disclosure for more info.
Your backyard has been waiting.
For years, maybe. Just sitting there while you looked at it from inside and thought, “I really should do something with that.”
You saved the pins. You liked the posts. You bookmarked the articles.
And then nothing changed.
Here’s the thing about backyards: they don’t transform themselves. You have to give them something to work with. A focal point. A destination. A reason to exist as something more than a patch of maintained grass.
A gazebo gives you that. The right one, placed correctly and styled thoughtfully, turns a forgettable outdoor space into somewhere you’ll want to be — with string lights glowing and a drink in hand.
These ten tips show you exactly how.
Why Dead Outdoor Spaces Stay Dead (And the First Step to Changing That)
Compare your living room to your backyard for a moment.
Your living room has furniture that tells you what to do. Sit here. Put your feet up. Have a conversation. The sofa, the coffee table, the lamp — each one communicates a use. The room functions as an invitation.
Your backyard is an open field by comparison. There’s nothing to tell you why you’d stay, so you don’t. You glance at it, confirm it’s still there, and go back inside.
A gazebo starts to fix this. It creates a defined zone. A room-equivalent outdoors that the brain recognizes as a place to inhabit rather than a place to pass through.
But — and this matters — only if you actually furnish and style it. An empty gazebo is just a defined zone with nothing in it. Still uninviting.
What follows is how to fill it.
1. Be Realistic About Gazebo Size Before You Fall in Love with Something Too Big
Scale is everything in outdoor design and it’s the mistake most people make.
A gazebo that looked spectacular in the Pinterest image was photographed in a yard twice the size of yours. Installed in your garden, the same structure consumes the entire space, leaves no breathing room, and shrinks the yard rather than enhancing it.
Measure your yard. Account for every other element. Then buy accordingly.
Smaller yard: a compact 8-foot canopy or an open pergola frame defines the outdoor room without crowding the property.
Average yard: a 10-to-12-foot hardtop gives you a properly proportioned living space — enough for seating, a table, plants, and movement around all of it.
Larger yard: create zones. A bigger gazebo anchoring a social area, with a secondary destination — a hammock, a reading nook — nearby.
Match the style to your home. Whatever visual language your house speaks — modern, traditional, rustic — the gazebo should answer it. Stylistic clash undermines even excellent proportions.
2. Watch Your Yard Before You Decide Where to Put the Gazebo
Gazebo placement requires observation, not assumption.
The middle of the lawn is the logical-seeming default. It’s also typically the sunniest, least sheltered, and most inconvenient-to-reach spot on the property. Everything about it conspires to make the gazebo feel less usable than it should be.
Before you decide anything, spend actual time in your yard at different times of day and in different conditions. Not planning time — observing time.
Where does natural shade appear in mid-afternoon? That’s where you want to be during summer.
How far is it from the kitchen to different spots in the yard? Distance from a cool drink and a snack dramatically affects how often you go somewhere.
What can you see from different positions? What’s attractive, what’s not, and which direction puts the best view in front of you when you’re seated?
Good placement is the decision that makes every other decision easier. Don’t rush it.
3. Install a Proper Floor Before Anything Else Goes In
Wet grass is not a floor. Mud is not a floor. Soft, uneven turf that turns into a swamp after rain is not a floor.
And yet that’s what you get if you skip this step — a beautiful overhead structure sitting on an unusable surface every time it rains.
Put in a real floor and the space works in all weather.
Pea gravel: lay weed membrane first, add two to three inches of pea gravel on top. Self-draining, simple, and looks natural and well-considered.
Pavers: more work upfront but the result is permanent, elegant, and requires essentially zero maintenance once properly installed.
Composite decking: the highest-quality option. Warm and comfortable underfoot, maintenance-light, and it creates the clearest visual signal that this is a real outdoor room and not a temporary installation.
Before any of these options: level the ground. This is non-negotiable. An uneven base creates wobbly furniture, poor drainage, and a space that never feels finished no matter how good everything else is.
4. Light Your Gazebo in Layers the Way Interior Designers Do
Outdoor lighting done well makes you look like you hired someone. Done poorly, it makes the space look like an afterthought or a car park.
The difference is layering: three distinct types of light working at different heights and intensities simultaneously.
Ambient: warm white string lights across the ceiling of the gazebo frame. This is your baseline atmosphere. Never use cool white bulbs outdoors — the effect is clinical and unflattering.
Task: a lantern or battery-powered lamp on the table. Sufficient for reading, eating, and conversation after dark, without washing out the ambient layer above.
Accent: Solar path lights or LED strip lighting at ground level around the structure’s perimeter. This makes the gazebo glow upward from the base and reads as a destination from across the garden.
Three layers. All available in solar-powered form. Charged by day, on automatically at dusk. Zero wiring required.
5. Design Privacy Into the Space So You Can Actually Unwind
There’s a psychological reality about exposed spaces: they don’t allow true relaxation.
When you can be observed, your attention stays partially outward-facing. The natural quiet of a rested mind doesn’t come. Instead you get a mild, persistent undercurrent of self-consciousness.
Simple screening removes this and the space becomes genuinely restorative.
Outdoor curtain panels are the simplest solution. Hung from the posts, they can be closed for seclusion and opened for air when you want the garden present around you.
A trellis with a climbing fragrant plant — jasmine, sweet peas, clematis — creates a living privacy screen that becomes more beautiful with every growing season.
Large planters with tall bamboo or statement grasses in substantial containers provide moveable, adjustable screening you can reconfigure at any time.
Key principle: screen most sides but not all. You want sanctuary, not isolation. Keep the garden accessible, visually and physically.
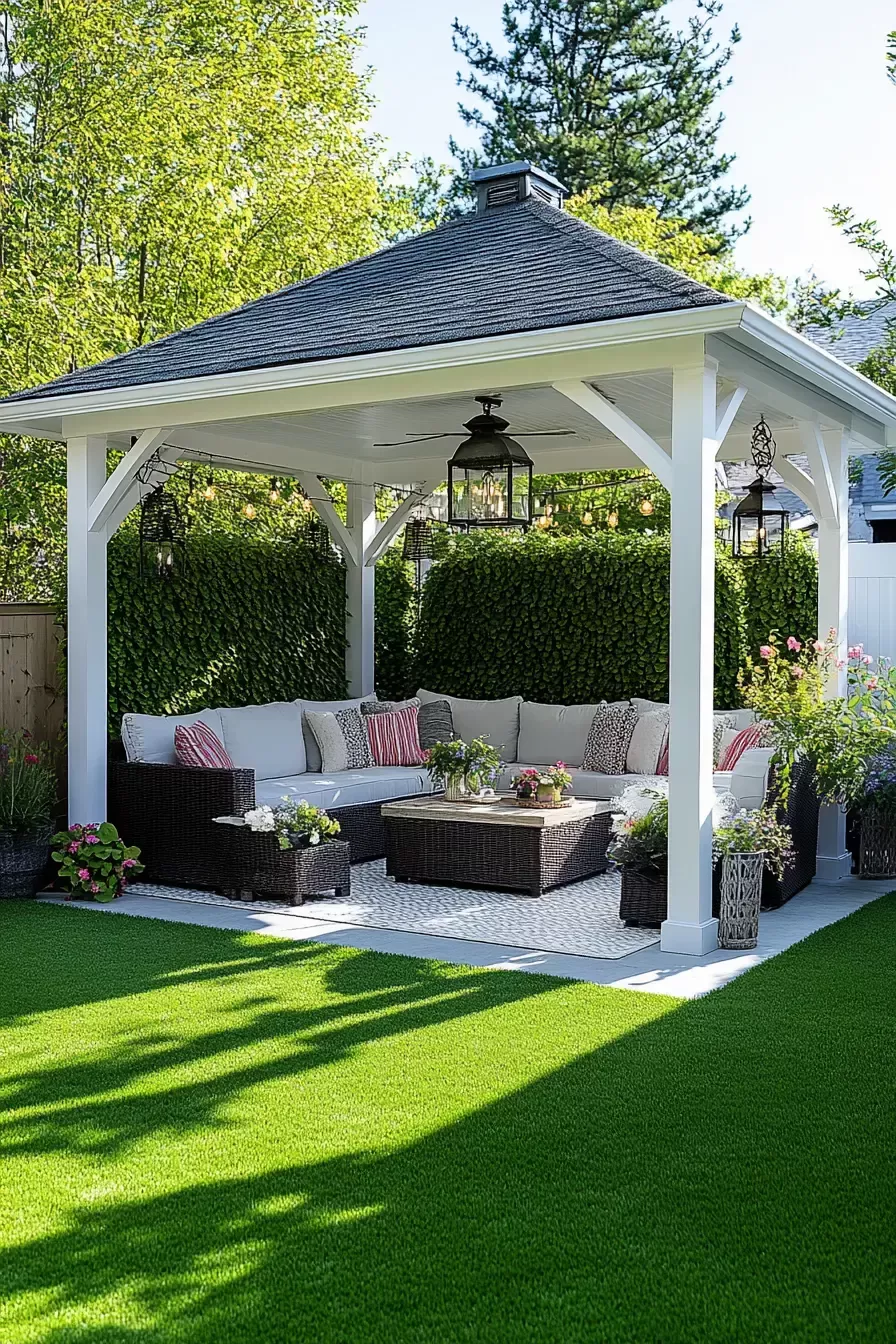
6. Treat Your Gazebo Like a Room Worth Furnishing Well
An unfurnished gazebo is an unused gazebo. And a poorly furnished one isn’t much better.
Think about this from the perspective of comfort, not just appearance. You’re trying to create a space that draws people in and keeps them there.
Start with seating that makes staying easy. Deep-cushioned outdoor lounge chairs or a well-upholstered outdoor sofa with cushions thick enough to sink into. You should be able to sit in the seating for ninety minutes without shifting uncomfortably.
Add a table of any kind. A surface to put things on is the difference between an awkward, juggling experience and a genuinely comfortable one.
Complete it with softness: throw pillows in colors you love, a light blanket for evenings when the temperature drops, and an outdoor rug underfoot to define and complete the space.
7. Surround the Structure with Plants That Make It Belong There
A gazebo without plants looks stranded. Like a building in a field. Like it arrived last week and is waiting for permission to stay.
Plants are the element that grants that permission. They soften the perimeter, transition between structure and garden, and make the whole composition look like it was designed as a single thing from the start.
Around the base: trailing or compact plants that soften the foot of the structure. Lavender is ideal — heat-tolerant, fragrant, and naturally graceful around hard surfaces.
Surrounding the perimeter: medium-height shrubs or ornamental grasses that frame the gazebo visually and give it the impression of having been there long enough for the garden to grow up around it.
Inside and above: trailing plants in hanging baskets from the rafters, floor-level specimen plants in decorative pots, a tabletop planter of fresh herbs for everyday use.
Build from low to high. Layered greenery creates depth. Depth creates the feeling of abundance. And abundance is what an outdoor sanctuary feels like.
8. Make the Space Work on Every Sensory Level
You know why certain spaces feel genuinely restorative while others just look nice? The restorative ones engage every sense.
Designing purely for photography produces spaces that look stunning but don’t feel like sanctuaries. Designing for the full sensory experience produces something that changes how you feel within minutes of sitting down.
Sound. A solar water fountain placed near the seating creates a continuous, gentle auditory background that muffles external noise and calms the nervous system remarkably quickly.
Deep-toned wind chimes catch passing breezes and add a musical, organic quality to the soundscape.
Smell. Fragrant herbs in pots within arm’s reach — rosemary, mint, lavender. A natural perfume carried on every breeze. A citronella candle on the table for insect deterrence and warm, scented light simultaneously.
Touch. Mix your materials: smooth wood, rough wicker, soft upholstery, cool stone. Variety of texture is something the hands and feet register continuously and it contributes to the feeling of a rich, complete environment.
Touch every sense and you stop building a structure. You start building an experience.
9. Weatherproof Your Setup Before the Seasons Do the Damage
Not the exciting part of the project. Absolutely essential to keeping the exciting parts intact.
Sun fades. Rain penetrates. Cold contracts. Wind tears. These are the forces working quietly and consistently against everything you’ve built. And they win by default unless you actively protect against them.
Cushions and upholstery: weather-resistant covers or quick-dry foam inserts. Before heavy rain arrives, move them to a weatherproof deck box. A minimal investment of time and effort prevents mold, fading, and structural breakdown.
Wood: sealed or stained every one to two years. Quality exterior products protect against moisture penetration and UV damage. A morning of work per season.
Metal: checked every spring for rust formation. Small spots caught early — a quick spray of rust-inhibiting paint. Left to spread, they become structural problems.
Fabric panels and canopies: stored inside over winter and in advance of major weather events. Folded, dry, and ready for next season.
Protect your investment. The goal is to enjoy this space for years, not to rebuild it every couple of seasons.
10. Anchor It Properly. This Is Not Optional.
The final tip is also the most consequential safety point in this entire guide.
An unanchored gazebo in a serious wind event is a significant hazard. Soft-top canopy structures in particular will lift, travel, and land somewhere problematic — on a car, through a fence, into a neighboring property. This is not a dramatic hypothetical. It happens repeatedly and it is completely avoidable.
Canopy and pop-up gazebos: heavy-duty ground stakes on every post, sandbag weights across all four corners, and guy ropes in areas with persistent strong winds. The stakes that come in the box are not sufficient for real weather conditions.
Hardtop and permanent structures: anchored into concrete. Poured footings, a proper slab, or bolted to an existing deck surface. No exceptions, no provisional arrangements.
Do the anchoring properly at installation. Then stop thinking about it and enjoy your oasis.
That freedom from worry is part of what the space is supposed to give you.
This Is the Part Where You Actually Start
You have the complete picture now.
Ten steps. Practical, actionable, achievable without a professional or a large renovation budget.
The only thing left is to stop reading and start doing. Not all ten at once — just one. The smallest possible action that moves you from planning to building.
Hang the string lights. Order the outdoor rug. Pot the lavender and set it beside the gazebo post.
From there, the next step is easier. And the one after that easier still.
And one evening soon — probably sooner than you expect — you’ll be sitting in your garden as the sun goes down, in a space that feels genuinely, unmistakably yours.
Your backyard has been waiting. Go give it what it’s been waiting for.
🔍 Yoast SEO Checklist
🔍 Focus Keyphrase: gazebo garden oasis
📌 SEO Title (< 60 chars): How to Create a Cozy Garden Oasis with Gazebo Tips
🔗 Slug (< 60 chars): cozy-garden-oasis-gazebo-tips
📝 Meta Description (< 155 chars): Transform your backyard into a cozy garden oasis with these expert gazebo tips on placement, lighting, privacy, and more. Start building your retreat today!